Halloween cupcakes are one of the easiest ways to make a dessert table look fun without making your life difficult.
That is exactly why I like them.
You can start with a simple chocolate or vanilla cupcake, add frosting, a few candy eyes, some crushed cookies, maybe a little melted chocolate, and suddenly the whole tray looks like it belongs at a Halloween party.
For this one, I’m changing the flow a little from the previous articles.
Instead of making every cupcake feel like a completely separate project, we’re building one easy cupcake base and turning it into five different spooky designs.
That means less prep.
Less cleanup.
And a lot more variety.
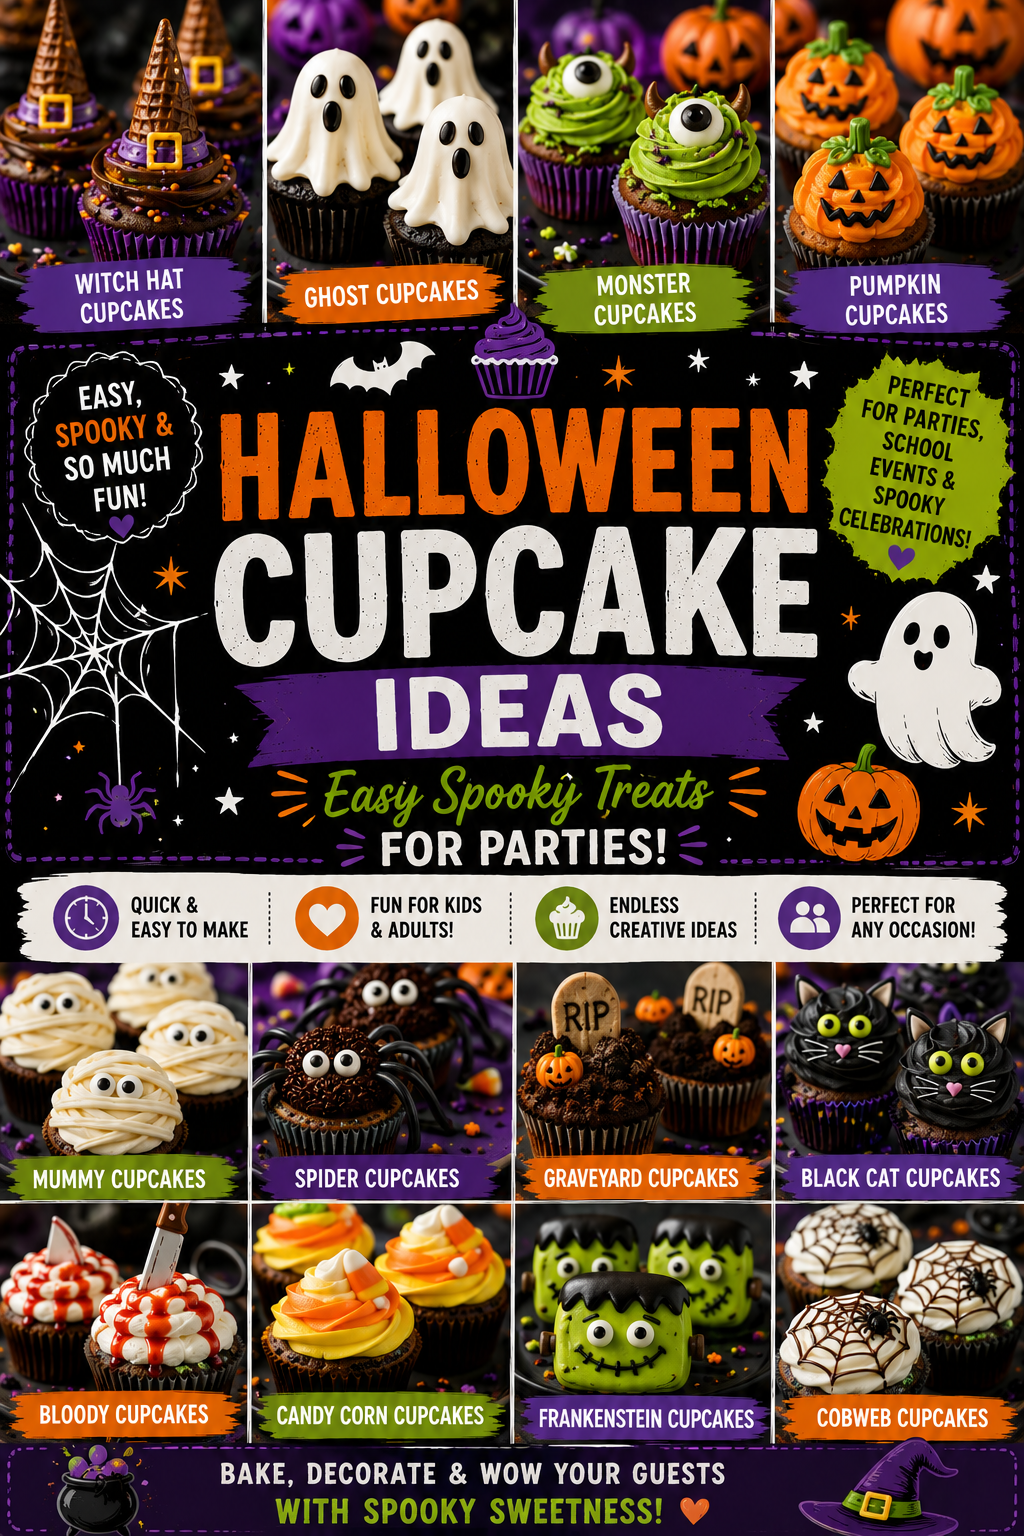
You’ll get monster cupcakes, spider cupcakes, ghost cupcakes, graveyard cupcakes, and pumpkin cupcakes from one simple baking session.
That is a much better way to handle party baking.
What You’ll Need
Chocolate Cupcake Base
- 1 1/2 cups all-purpose flour
- 1 cup granulated sugar
- 1/3 cup unsweetened cocoa powder
- 1 teaspoon baking soda
- 1/2 teaspoon salt
- 1 cup whole milk
- 1/3 cup vegetable oil
- 1 large egg
- 1 teaspoon vanilla extract
- 1 teaspoon apple cider vinegar
Monster Cupcake Topping
- 1/2 cup vanilla frosting
- 9 candy eyes
- 2 tablespoons Halloween sprinkles
Spider Cupcake Topping
- 1/2 cup chocolate frosting
- 3 round chocolate candies
- 6 candy eyes
- 1/4 cup semi-sweet chocolate chips, melted
Ghost Cupcake Topping
- 1/2 cup vanilla frosting
- 6 mini chocolate chips
- 3 regular chocolate chips
Graveyard Cupcake Topping
- 1/2 cup chocolate frosting
- 3 oval vanilla sandwich cookies
- 1/4 cup crushed chocolate sandwich cookies
- 2 tablespoons semi-sweet chocolate chips, melted
- 3 candy pumpkins
Pumpkin Cupcake Topping
- 1/2 cup vanilla frosting
- 2 tablespoons orange decorating sugar
- 3 small pieces of green candy
- 1 tablespoon semi-sweet chocolate chips, melted
Tools You’ll Need
- 12-cup muffin pan
- Cupcake liners
- Large mixing bowl
- Medium mixing bowls
- Small mixing bowls
- Whisk
- Rubber spatula
- Measuring cups and spoons
- Ice cream scoop or large spoon
- Cooling rack
- Piping bags or zip-top bags
- Small offset spatula or butter knife
- Microwave-safe bowl
- Toothpicks
- Serving platter
Start With One Easy Cupcake Base
Before we turn anything into spiders or ghosts, we need cupcakes.
Preheat your oven to 350°F.
Line a 12-cup muffin pan with cupcake liners.
In a large bowl, whisk together the flour, sugar, cocoa powder, baking soda, and salt.
In another bowl, whisk the milk, vegetable oil, egg, vanilla, and apple cider vinegar.
Pour the wet mixture into the dry ingredients.
Stir gently until everything is just combined.
The batter may look slightly thinner than a traditional cake batter.
That is fine.
Divide the batter evenly among the cupcake liners, filling each about two-thirds full.
Bake for approximately 18 to 22 minutes.
Check the center with a toothpick.
It should come out clean or with a few moist crumbs.
Let the cupcakes cool in the pan for several minutes.
Then transfer them to a cooling rack.
Now leave them alone.
Seriously.
Warm cupcakes and frosting do not get along.
If you start decorating too soon, you’ll have melting frosting and sliding decorations everywhere.
Let them cool completely before doing anything spooky.
Pro Tips
- Bake all the cupcakes first. Decorating goes much faster when you have a completely cooled batch in front of you.
- Use zip-top bags for small details. You do not need professional piping bags.
- Keep one decoration idea per cupcake. Too many details make them messy.
- Set up toppings in small bowls. It makes decorating much faster.
- Decorate assembly-line style. Finish all the spiders, then ghosts, then monsters instead of switching constantly.
1. Monster Cupcakes
These are the easiest place to start.
You do not need neat frosting.
In fact, messy works better.
Spread or pipe vanilla frosting over three cupcakes.
Use the back of a spoon to make little peaks and swirls.
Add three candy eyes to each cupcake.
Not two.
Three.
That immediately changes the whole look.
Add Halloween sprinkles around the edges.
Done.
These are perfect for kids because there is almost no way to mess them up.
Too many eyes?
Still a monster.
Crooked frosting?
Definitely still a monster.
This is very forgiving decorating.
2. Spider Cupcakes
These look much more detailed than they actually are.
Spread chocolate frosting over three cupcakes.
Place one round chocolate candy in the center of each cupcake.
That becomes the spider body.
Attach two candy eyes to each chocolate candy using a tiny dab of melted chocolate.
Now melt the semi-sweet chocolate chips.
Transfer the chocolate to a zip-top bag.
Snip the tiniest corner from the bag.
Pipe four thin legs on each side of the chocolate candy.
You now have eight legs.
Hopefully.
If one spider gets seven, I doubt anyone at the party is counting.
Let the chocolate set before moving the cupcakes.
Thin legs look better than thick ones.
If your chocolate is coming out too quickly, make the opening smaller.
3. Ghost Cupcakes
This one might be the cleanest design on the tray.
Pipe or spoon vanilla frosting high onto three cupcakes.
You want a tall swirl rather than a flat layer.
If you have a piping bag, use a large round opening.
No piping bag?
Put the frosting in a zip-top bag and snip off one corner.
Pipe upward in a loose spiral.
Add two mini chocolate chips for eyes.
Place one regular chocolate chip underneath for the mouth.
That is it.
The frosting becomes the ghost body.
Do not spend time trying to make all three ghosts identical.
One can be tall.
One can lean slightly.
One can look like it has already had enough of the party.
The different shapes make the platter more fun.
4. Graveyard Cupcakes
These are the ones I would put toward the center of the serving platter.
They give you a little more detail without requiring much extra work.
Spread chocolate frosting over three cupcakes.
Sprinkle crushed chocolate sandwich cookies over the top.
Now you have dirt.
Use melted chocolate to draw a small cross or simple line on each oval vanilla sandwich cookie.
Let the chocolate set.
Push one cookie gently into each cupcake like a tombstone.
Add one candy pumpkin beside it.
That gives you a tiny graveyard on top of each cupcake.
Do not push the cookie too deeply.
You only need enough of it in the frosting to hold it upright.
If the tombstone keeps falling over, chill the cupcake briefly before trying again.
5. Pumpkin Cupcakes
These are a nice break from all the black and chocolate decorations.
Spread vanilla frosting over three cupcakes.
Sprinkle orange decorating sugar generously over the frosting.
Use the back of a spoon or the edge of a butter knife to create a few curved lines in the frosting.
Those become the pumpkin grooves.
Place a small piece of green candy at the top for the stem.
Use melted chocolate to add simple triangle eyes and a little mouth if you want a jack-o’-lantern look.
Or leave the face off and keep them as little pumpkins.
This version is especially good if you want the tray to look colorful instead of completely dark and spooky.
The Easy Way to Decorate a Whole Batch
This is where I would change the usual cupcake routine.
Do not decorate one cupcake from start to finish.
That takes forever.
Instead, work in stages.
First:
- Frost all 12 cupcakes.
- Separate them into groups of three.
- Put all your decorations in small bowls.
- Melt your chocolate once.
- Use the same piping bag for all chocolate details.
Then finish each group.
This saves a surprising amount of time.
It also keeps the kitchen from becoming a pile of open sprinkle containers, half-used frosting tubs, and sticky spoons.
How to Make Them Look Different Without Baking Five Cupcake Flavors
This is the whole point of the recipe.
One chocolate cupcake base.
Five different looks.
You can make the tray feel varied through toppings instead of making separate batters.
The monsters look playful.
The spiders look darker.
The ghosts bring white contrast.
The graveyards look detailed.
The pumpkins add orange.
When they all sit together on one platter, it looks like you baked five different Halloween cupcake recipes.
You really baked one.
That is a much better use of your time.
Substitutions and Variations
These designs are easy to switch around.
Chocolate cupcakes: Use vanilla cupcakes if you prefer.
Vanilla frosting: Cream cheese frosting works if you like a tangier flavor.
Chocolate frosting: Use chocolate buttercream or ganache.
Candy eyes: Pipe tiny white chocolate dots with dark chocolate centers.
Round chocolate candies: Small peanut butter cups can work for spider bodies.
Chocolate sandwich cookies: Use any crisp chocolate cookie for graveyard dirt.
Orange decorating sugar: Orange sprinkles work too.
Green candy: Use a tiny piece of green licorice or fondant.
Oval cookies: Milano-style cookies work well for tombstones.
You can also switch the cupcake flavors.
Pumpkin cupcakes with ghost frosting would be great.
Red velvet cupcakes can work for a darker Halloween look.
And vanilla cupcakes are useful when you want the decorations to stand out more.
Make-Ahead Tips
These cupcakes are very easy to split across two days.
The Day Before
Bake the cupcakes.
Let them cool completely.
Store them in an airtight container.
Prepare the cookie crumbs.
Organize candy eyes and decorations.
Party Day
Frost the cupcakes.
Add the spiders, ghosts, monsters, graveyards, and pumpkins.
Let melted chocolate details set.
Arrange everything on a platter.
This means party day becomes decorating instead of baking and decorating.
Much easier.
How to Build a Halloween Cupcake Platter
You do not need to place them randomly.
A little structure makes the platter look much better.
Try this:
| Cupcake | Main Color | Look |
|---|---|---|
| Monster | White with sprinkles | Playful |
| Spider | Dark chocolate | Creepy |
| Ghost | White | Clean and spooky |
| Graveyard | Brown and black | Detailed |
| Pumpkin | Orange | Bright |
Put the ghost and pumpkin cupcakes between darker designs.
That gives the tray contrast.
Group similar cupcakes loosely instead of creating perfect rows.
And leave a little space between them.
A crowded platter makes the designs harder to see.
Halloween Cupcakes for Kids
If kids are helping, give them the easy jobs.
Good options include:
- Adding candy eyes
- Adding sprinkles
- Placing candy pumpkins
- Pressing cookie tombstones into frosting
- Adding green pumpkin stems
Adults should handle melted chocolate and any fine piping if the kids are very young.
You can even set up a cupcake decorating table.
Put out plain frosted cupcakes.
Then let everyone choose eyes, sprinkles, cookie crumbs, and candy.
The finished cupcakes will probably look completely chaotic.
That is kind of the point.
How Many Cupcakes Should You Make for a Party?
For most parties, plan around one cupcake per person if other desserts are being served.
If cupcakes are the main dessert, make a few extras.
Kids often choose based entirely on the decoration.
Which means one design can disappear much faster than another.
If you are serving 12 people, a dozen cupcakes works.
For 20 guests, make 24.
For a larger gathering, doubling this recipe is easy.
You can keep the same five decorating styles or introduce a sixth.
Leftovers and Storage
Store decorated cupcakes in a covered container.
If your frosting is shelf-stable, they can usually sit at room temperature for a short period.
If you’re using cream cheese frosting or another perishable frosting, refrigerate them.
For the best texture, most cupcakes are nicest within 2 to 3 days.
If refrigerating, let them sit at room temperature briefly before serving.
Cold cake can feel firmer than freshly baked cake.
Try not to stack decorated cupcakes.
The spiders and tombstones will not survive.
Frequently Asked Questions
Can I use boxed cake mix?
Yes.
If you’re short on time, use a chocolate or vanilla boxed mix and focus on the decorating ideas.
Can I decorate the cupcakes the night before?
Yes.
Most of these decorations can be added the night before. Store the cupcakes carefully so the designs don’t get crushed.
What frosting works best for Halloween cupcakes?
A medium-thick buttercream or canned frosting works well because it holds decorations.
How do I stop candy eyes from falling off?
Press them into soft frosting or use a tiny dot of melted chocolate.
Can I make these without candy eyes?
Yes.
Use white chocolate dots with tiny dark chocolate centers.
Can I make mini Halloween cupcakes?
Absolutely.
Mini cupcakes are great for parties. Reduce the baking time and start checking them much earlier.
Can kids decorate these cupcakes?
Yes.
Monster and pumpkin cupcakes are especially easy for kids.
How can I make Halloween cupcakes look spooky without food coloring?
Use chocolate, cookie crumbs, candy eyes, white frosting, orange sprinkles, and naturally dark ingredients.
Can I freeze cupcakes?
Yes.
Freeze unfrosted cupcakes for the easiest storage. Thaw completely before decorating.
What Halloween cupcake design is easiest?
Monster cupcakes are probably the easiest because messy frosting actually helps.
Wrapping Up
One batch of cupcakes can give you an entire Halloween dessert platter.
That is what makes this approach so useful.
Bake one chocolate cupcake recipe.
Then divide the batch.
Give a few too many eyes.
Add spiders to another group.
Pipe some ghosts.
Build tiny graveyards.
Finish with orange pumpkin cupcakes.
You get five different looks without making five different batters.
That is the kind of Halloween baking I can get behind.
Make the cupcakes the day before if you are hosting.
Then turn party day into a decorating session instead of a full baking project.
If you try these Halloween cupcake ideas, leave a comment and tell me which design you made.
I want to know which one disappeared from the platter first.