Oreos are already doing most of the work.
They’re round, chocolatey, easy to dip, and sturdy enough to survive a decorating session involving melted chocolate, candy eyes, sprinkles, and several enthusiastic hands. You don’t need to bake anything, and a small amount of decoration can turn one cookie into something convincingly spooky.
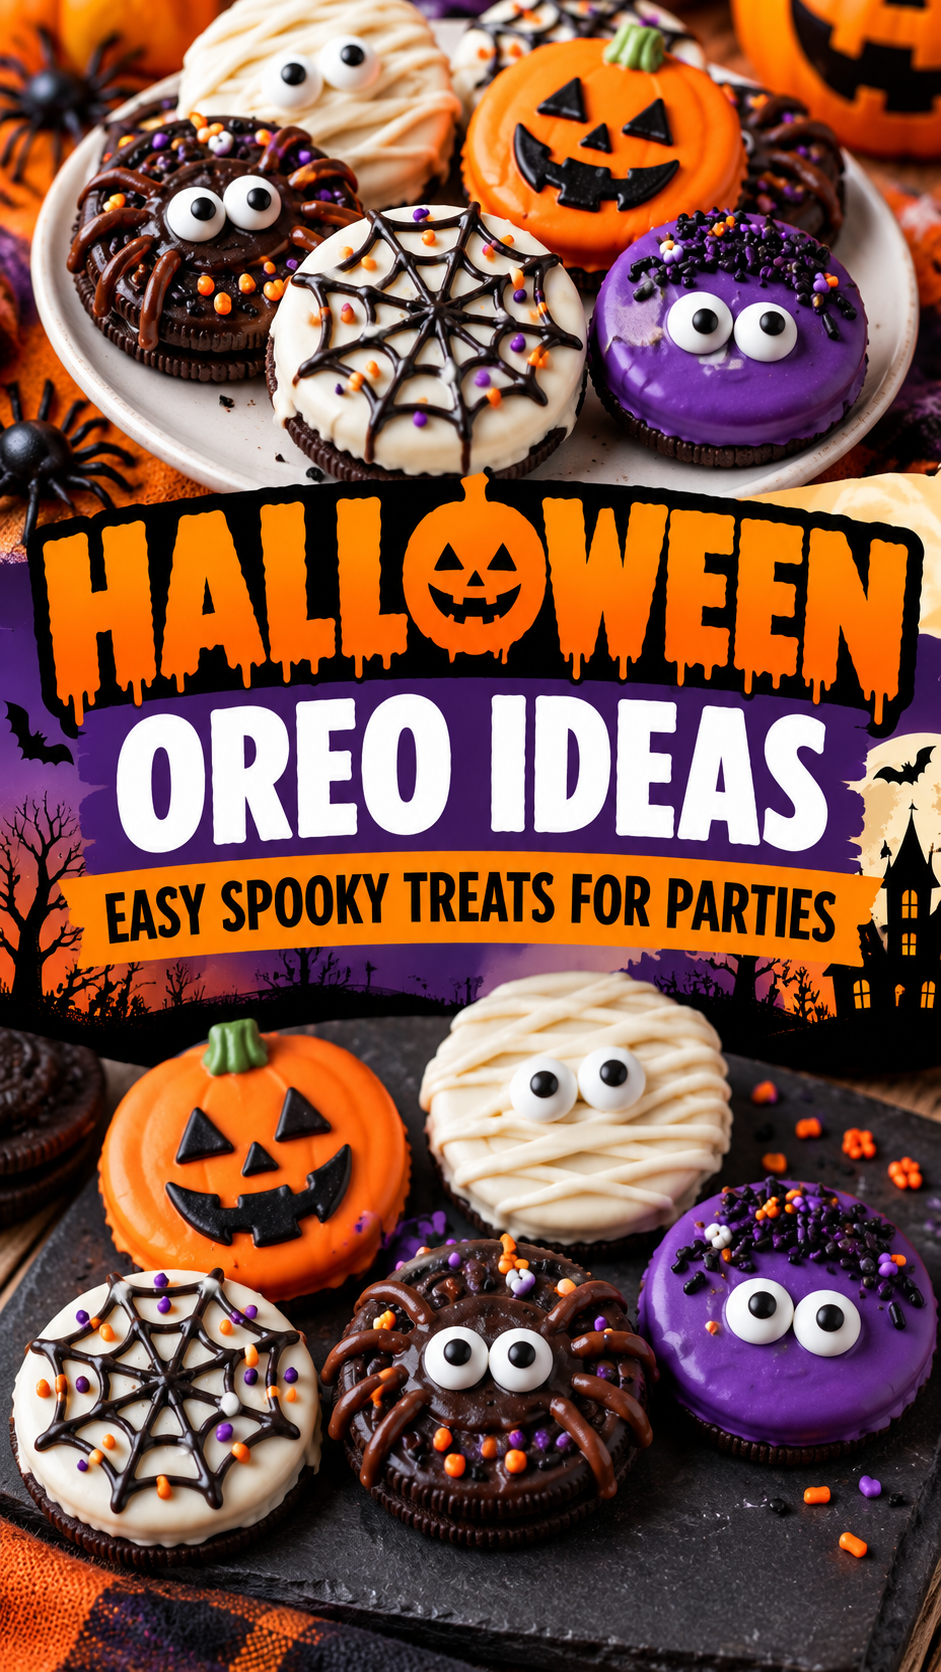
For this Halloween batch, we’re making mummy Oreos, spider Oreos, monster Oreos, pumpkin Oreos, and Oreo bats.
Make all five for a party platter or choose one design and make a whole tray. Either approach is considerably easier than piping 30 tiny ghosts onto cupcakes.
What You’ll Need
Mummy Oreos
- 12 Oreo cookies
- 1 1/2 cups white chocolate or white candy melts
- 24 candy eyes
- 1 teaspoon neutral oil, if needed
Spider Oreos
- 12 Oreo cookies
- 1 cup semisweet chocolate
- 24 candy eyes
- 48 thin pretzel-stick pieces
- Halloween sprinkles, optional
Monster Oreos
- 12 Oreo cookies
- 1 cup green, purple, or orange candy melts
- Assorted candy eyes
- Halloween sprinkles
- Mini chocolate chips, optional
Pumpkin Oreos
- 12 Oreo cookies
- 1 cup orange candy melts
- Green decorating icing
- Small pretzel pieces, optional
- Semisweet chocolate, optional
Oreo Bats
- 12 Oreo cookies
- 12 additional Oreo cookies for the wings
- 1/2 cup melted semisweet chocolate
- 24 candy eyes
- Small white chocolate chips or icing for fangs, optional
Tools You’ll Need
You won’t need an oven.
Grab:
- Baking sheets
- Parchment paper
- Microwave-safe bowls
- Forks
- Small spoons
- Piping bags or zip-top bags
- Toothpicks
- Small sharp knife
A fork is particularly useful for dipping whole cookies. Lower the cookie into the coating, lift it from underneath, and gently tap the fork against the bowl to remove the excess.
Set out the decorations before melting anything.
Candy eyes have a remarkable ability to disappear into the pantry precisely when the chocolate is ready.
Mummy Oreos
Mummies are a good place to start because messy lines are part of the design.
If your piping skills are questionable, Halloween has finally provided a supportive environment.
Dip the Cookies
Line a baking sheet with parchment paper.
Melt the white chocolate or candy coating according to package directions.
Drop one Oreo into the coating and turn it until covered.
Lift it with a fork and gently tap away the excess.
Place it on the parchment.
Repeat with the remaining cookies.
Create the Mummy Face
While the coating is still soft, add two candy eyes.
Let the first coating firm slightly.
Transfer the remaining melted white coating to a piping bag and cut a tiny opening.
Drizzle irregular lines back and forth over each cookie, leaving the eyes visible.
Let everything set.
That’s your mummy.
No additional historical accuracy required.
Spider Oreos
These spiders are more cute than terrifying, which is probably a good arrangement for something you’re planning to eat.
Pretzel pieces create the legs and add a salty crunch.
Prepare the Legs
Break thin pretzel sticks into short pieces.
You’ll need about four pieces per cookie if you’re making a simplified spider. If you want eight legs, prepare eight.
Nobody is going to reject dessert because your cookie spider failed an anatomy exam.
Assemble
Melt the semisweet chocolate.
Dip each Oreo completely in chocolate and place it on parchment.
While the coating is still soft, carefully press the pretzel pieces around the sides.
Add two candy eyes.
If the legs don’t want to stay attached, use a small dab of melted chocolate as edible glue.
Let the spiders set completely before moving them.
These are particularly good on a platter with mummy cookies because the dark and white coatings give you instant contrast without requiring additional decorations.
A Few Tricks Before You Dip the Next Cookie
Chocolate-covered Oreos are simple, but a few details make the process much less messy.
Use completely dry equipment. Water can cause melted chocolate to seize.
Heat slowly. Microwave chocolate or candy coating in short intervals, stirring between each one.
Don’t over-thin the coating. If your particular chocolate needs thinning, add only a tiny amount of neutral oil at a time.
Tap off the excess. Too much coating creates a thick puddle around the cookie.
Add decorations while the surface is wet. Once the coating sets, candy eyes become considerably less cooperative.
And don’t worry if every dipped cookie isn’t perfectly smooth.
We’re making monsters and mummies.
A little surface irregularity has excellent job security here.
Monster Oreos
Monster cookies are where the decorating rules mostly disappear.
That makes them particularly good for a Halloween party with kids.
Choose Your Colors
Melt green, purple, or orange candy coating in separate bowls.
You can make all the monsters one color or divide the cookies between several.
Dip the Oreos and place them on parchment.
Make Each Monster Different
Before the coating sets, add:
- One candy eye
- Two mismatched eyes
- Three or more small eyes
- Sprinkles for hair
- Mini chocolate chips for teeth
You can also pipe crooked mouths with melted chocolate after the first coating has set.
Don’t aim for identical monsters.
One has three eyes. Another has seven sprinkles attached to its forehead. A third appears mildly concerned about the entire situation.
Perfect.
There is no monster committee checking biological consistency.
Pumpkin Oreos
Pumpkin Oreos are less spooky and more festive, which is useful when your Halloween table already contains several desserts involving eyeballs.
The round cookie does most of the shape work for you.
Make Them Orange
Melt the orange candy coating.
Dip each Oreo completely and transfer it to parchment.
Before the coating sets, add a tiny pretzel piece at the top for a stem.
Let the cookies firm up.
Add the Details
Use green icing to pipe a small leaf or vine beside the stem.
For a jack-o’-lantern version, use melted semisweet chocolate to add:
- Two triangle eyes
- A tiny nose
- A crooked mouth
Keep the face simple.
Trying to fit a detailed expression onto a sandwich cookie is how an easy Halloween dessert develops unreasonable ambitions.
If you want plain pumpkins, skip the face entirely and pipe a few darker-orange lines across the cookie.
Oreo Bats
Bat Oreos look like they require more effort than they actually do.
The trick is using another Oreo to create the wings.
Make the Wings
Carefully separate several extra cookies.
Remove the cream filling and cut or break each chocolate wafer in half.
Don’t worry about creating perfectly identical halves.
Slightly jagged wings look perfectly appropriate.
Build the Bats
Melt the semisweet chocolate.
Place a small dab on each side of a whole Oreo.
Press a wafer half into each side to form wings.
Let them firm up briefly.
Add two small dots of chocolate to the front and attach candy eyes.
If you want fangs, add tiny white icing triangles beneath the eyes.
That’s enough.
A bat cookie does not require a complete dental record.
If you’re transporting these, place the bats in a single layer. Their wings are more fragile than the fully dipped designs.
Turn One Package Into a Mixed Halloween Platter
You don’t need 12 cookies of every design.
For a party, make smaller batches.
A platter could have:
- 6 mummy Oreos
- 6 spiders
- 8 monsters
- 6 pumpkins
- 6 bats
That gives you plenty of variety without spending your entire afternoon attaching candy eyes to sandwich cookies.
You can fill empty spaces on the platter with plain Oreos, chocolate-covered pretzels, or other simple treats.
For an even easier version, forget the characters entirely.
Dip half an Oreo in chocolate and add orange, black, purple, or green sprinkles.
Done.
Halloween treats are allowed to be recognizable food.
Easy Variations
These designs are flexible.
Use white chocolate for ghost Oreos and add two dark chocolate eyes.
Turn orange-coated cookies into jack-o’-lanterns.
Use crushed Oreo crumbs as edible graveyard dirt.
Add a little melted red candy coating around vampire cookies.
You can also use different Oreo flavors if you want variety inside the cookies.
For a simpler monster, skip the full dip and use melted chocolate only to attach candy eyes directly to the cookie.
Candy melts are convenient for strong Halloween colors, but regular white, milk, or dark chocolate works for many designs.
If coloring real white chocolate, use coloring suitable for chocolate. Water-based coloring can cause problems.
Make-Ahead Tips for Party Day
These are exactly the kind of Halloween desserts worth finishing before party day.
Most designs can be made one or two days ahead.
Let every coating and decoration set completely before transferring the cookies to storage containers.
Keep delicate bat cookies in a single layer.
Mummies, pumpkins, and monsters can usually be layered with parchment between them.
You can also organize the entire decorating station ahead of time.
Put sprinkles, eyes, pretzel pieces, and other decorations into small bowls.
Then melt the coatings and work one design at a time.
Trying to keep four different bowls of chocolate melted while simultaneously creating bats, pumpkins, spiders, and monsters is not efficiency.
It is a small confectionery emergency.
A Note About Kids, Allergies and Decorations
Halloween treats often involve small, firm decorations, so adjust them for the age of the children you’re serving.
Hard candies, whole nuts, popcorn, large marshmallows, gummy candies, firm pretzel pieces, and similar foods can be choking hazards for very young children.
For younger kids, simpler chocolate-dipped cookies with age-appropriate decorations may be better.
Also check ingredient labels carefully when allergies are a concern.
Oreos, pretzels, chocolate, candy melts, sprinkles, and candy decorations can contain allergens or be produced in facilities where cross-contact is possible.
If you’re making these for a school or community event, check the specific allergy rules before choosing toppings.
Halloween surprises should come from costumes.
The ingredient list can remain boringly predictable.
Storage
Once the coating has completely hardened, store the decorated Oreos in an airtight container somewhere cool and dry.
Place parchment between layers.
Most are best within several days, while the cookies and pretzel decorations still have good texture.
Ordinary chocolate-dipped Oreos generally don’t require refrigeration. A cool room is preferable because refrigeration can create condensation when the cookies come back to room temperature.
If you add a perishable filling or topping such as cream cheese frosting, whipped cream, or another refrigerated ingredient, store those versions at 40°F or below.
Perishable foods should not remain at room temperature longer than 2 hours, or 1 hour when temperatures are above 90°F.
For the five versions here, airtight room-temperature storage is the easiest option.
Frequently Asked Questions
What can I make with Oreos for Halloween?
Mummies, monsters, spiders, pumpkins, bats, ghosts, jack-o’-lanterns, and simple sprinkle-covered cookies all work well.
What’s the easiest Halloween Oreo design?
Mummy Oreos are hard to mess up. Dip them in white coating, add eyes, and drizzle more white coating across the top.
Can I make Halloween Oreos ahead of time?
Yes. Most can be made one or two days ahead and kept in an airtight container.
Can kids decorate Oreo Halloween treats?
Yes. Kids can add candy eyes and sprinkles once melted coatings are cool enough to handle safely. Adults should supervise hot bowls.
Can I use regular chocolate instead of candy melts?
Yes. Milk, dark, and white chocolate work well, though candy melts are often easier when you want bright Halloween colors.
Why is my melted chocolate too thick?
It may have been overheated, or it may simply be a thicker chocolate. Heat gently and, when appropriate, add a very small amount of neutral oil.
How do I stop dipped Oreos from sticking?
Place them on parchment or wax paper and allow the coating to set completely before moving them.
Should Halloween Oreos be refrigerated?
Usually not when made only with cookies, chocolate, and shelf-stable decorations. Refrigerate versions containing perishable toppings or fillings.
How many should I make for a party?
If several desserts are being served, plan roughly one or two decorated cookies per guest.
Wrapping Up
Halloween Oreos prove that spooky desserts don’t need to become an afternoon-long craft project.
Dip a cookie in white chocolate and you have a mummy.
Add pretzel legs and it becomes a spider.
Bright coating and several questionable eye placements create monsters.
Orange chocolate handles the pumpkins, while a couple of chocolate wafer halves turn an ordinary cookie into a surprisingly convincing bat.
Make one design or put all five on the same platter.
And if a bat loses a wing or a monster’s eye slides sideways before the chocolate sets, leave it.
Halloween is one of the few occasions when slightly alarming food presentation means things are going according to plan.
If you try these Halloween Oreo ideas, leave a comment and tell me which design you made, or share any questions below.